
Summary Table
| Protection Method | Frequency | Difficulty | Best Used For |
| Fibre Protectant Spray | Every 12-18 months | Moderate | Creating a liquid-repelling barrier on all rug types. |
| Vacuuming | 1-2 times per week | Easy | Removing dry soil that damages fibres and locks in stains. |
| No Shoes Policy | Daily Habit | Easy | preventing oil and mud from entering the home. |
| Professional Cleaning | Every 12-24 months | N/A (Service) | Deeply extracting dirt and resetting the rug pile. |
| Rug Pads | One-time install | Easy | Preventing slipping and reducing wear and tear. |
Why Rug Protection Matters
Rugs are often the focal point of a room, tying together furniture and decor. Whether you have a hand-knotted Persian rug, a durable wool loop, or a modern synthetic shag, rugs represent a significant investment. Protecting them is not just about keeping them looking clean; it is about extending their lifespan.
When a liquid spills on an unprotected rug, it seeps deep into the pile and is absorbed by the backing. This can lead to permanent discolouration, bad odours, and even mould growth. By establishing a protection routine, you save money on professional restoration and keep your home environment healthy.

Phase 1: Prevention Through Selection and Placement
Protection starts before you even buy cleaning products. It begins with choosing the right rug for the right location.
Choosing the Right Material
Not all rug fibres are created equal. Some naturally repel stains, while others absorb them like a sponge.
- Wool: Wool is naturally durable and has a waxy coating that repels small amounts of water. However, it is porous and will eventually absorb liquid if left too long. It is excellent for living rooms but requires care with acid-based stains (like vomit or wine).
- Polypropylene (Olefin): This is a synthetic fibre that is essentially plastic. It is highly stain-resistant and easy to clean (often bleach-cleanable). This is the best choice for dining rooms or playrooms where spills are inevitable.
- Nylon: Very durable and resilient, but acid dyes in food can stain it easily if it is not treated with a stain blocker.
- Cotton and Silk: These are highly absorbent and very difficult to clean. Avoid placing these in high-traffic areas or dining zones.
- Seagrass and Jute: These natural plant fibres look great but are very absorbent and can rot if they get too wet. They are not recommended for kitchens or bathrooms.
Strategic Placement
Where you put your rug dictates how dirty it will get.
- Entryways: Use a “sacrificial” mat at the door. A rough coir doormat outside and a washable cotton mat inside will catch 80% of the dirt and moisture before it reaches your expensive living room rug.
- Dining Tables: Ensure the rug is large enough that chairs do not slide off the edge when pulled out. This prevents the edges from curling and becoming tripping hazards or dirt traps.
- Sunlight: Rotate your rug every six months. Sunlight fades colours, making stains look even more prominent on unevenly faded rugs.
Phase 2: Applying Fibre Protectants
The most effective physical barrier against stains is a fibre protectant spray. These are chemical treatments that coat the individual fibres of the rug. They lower the surface tension of the rug, causing liquids to “bead up” on the surface rather than soaking in. This buys you time to run and get a paper towel.
Professional vs DIY Application
You can apply these protectants yourself or hire a professional.
- Factory Applied: Many synthetic rugs come with a stain blocker applied at the factory. However, this wears off over time due to walking and vacuuming.
- Professional Application: Professional carpet cleaners can apply high-quality protectants (like Scotchgard or Teflon) using electric sprayers. This ensures even coverage and is usually done after a deep clean.
- DIY Sprays: You can buy cans of fabric protector at hardware stores. This is cheaper but requires care. You must ensure the room is ventilated and that you do not inhale the fumes.
How to Apply a Protectant Spray at Home
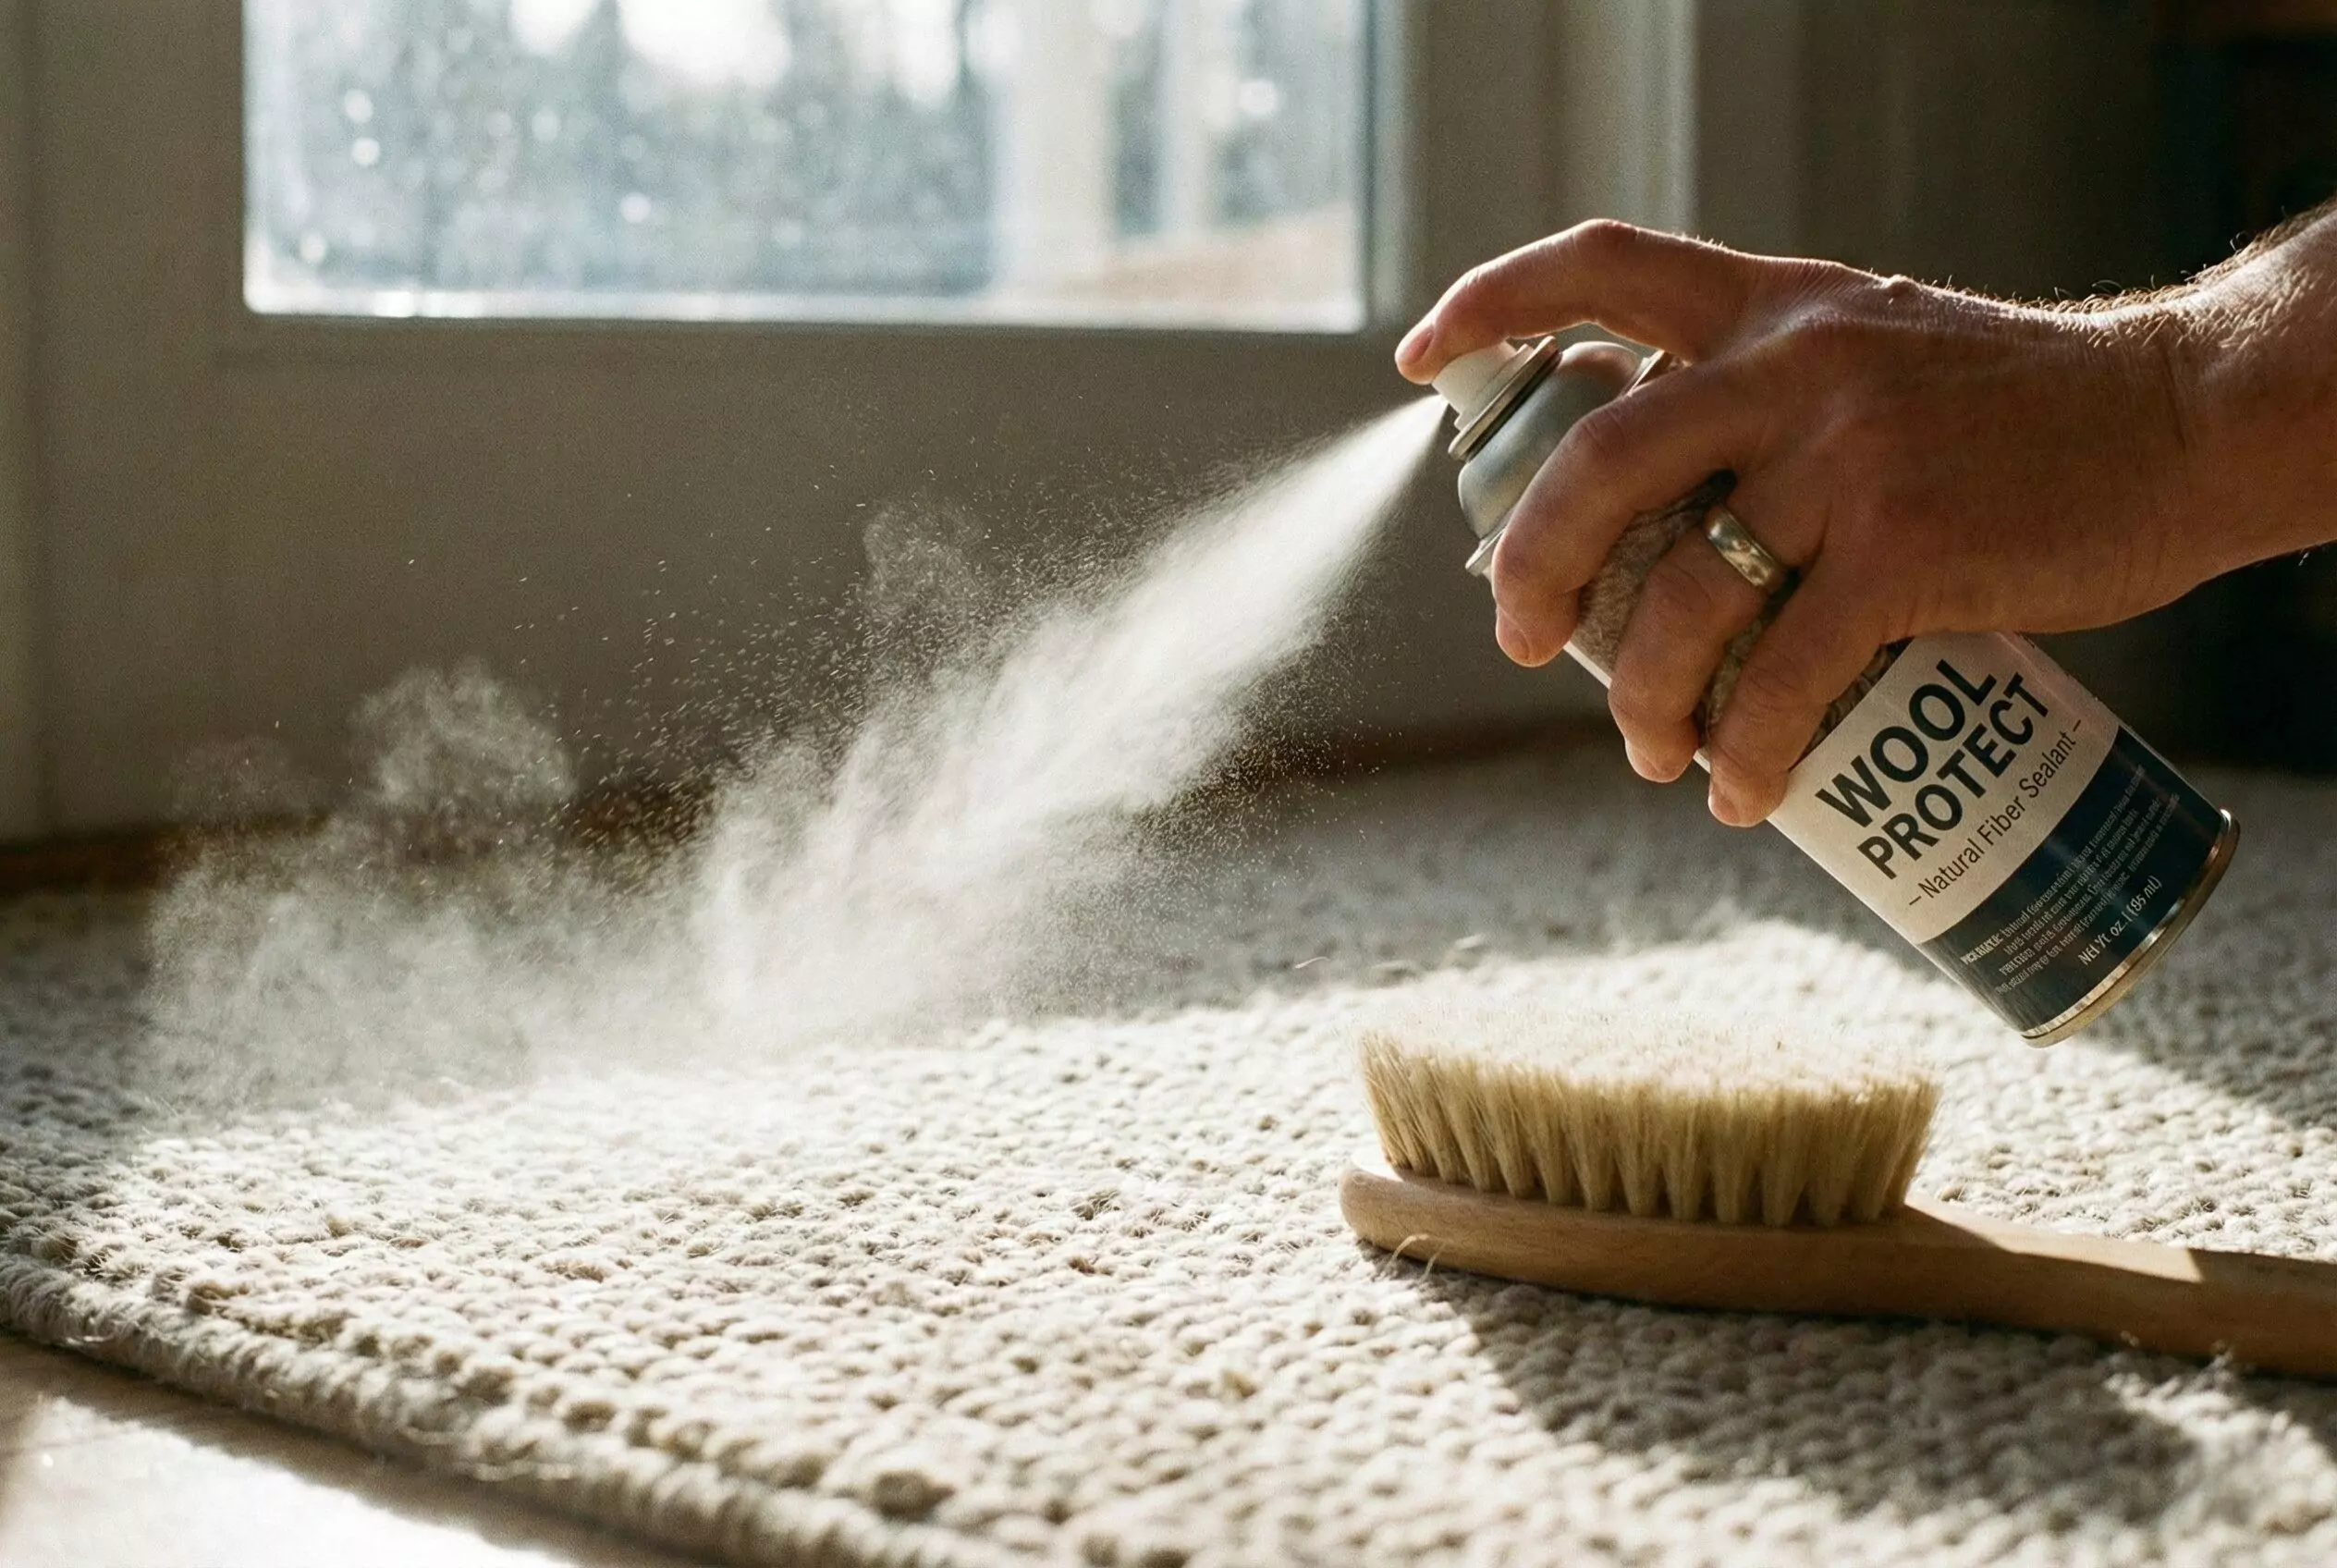
If you choose the DIY route, follow these steps strictly:
- Clean First: Never seal in dirt. Thoroughly vacuum the rug. If it is dirty, have it cleaned first and let it dry completely.
- Ventilate: Open all windows and doors.
- Test: Spray a tiny amount in an inconspicuous corner to ensure it does not change the colour of the rug.
- Spray Evenly: Hold the can about 15cm to 20cm away from the rug. Spray in a slow, sweeping motion, overlapping your strokes slightly.
- Brush In: Use a soft-bristled brush to gently work the product into the pile so it coats the entire fibre, not just the top.
- Dry: Let the rug dry completely (usually 2 to 6 hours) before walking on it.
Phase 3: Daily and Weekly Habits
The best way to stop stains is to stop the dirt that causes them. Dry soil acts like sandpaper. When you walk on a dirty rug, the grit cuts the fibres, creating rough spots that hold onto stains more stubbornly.
The No-Shoes Rule
This is the single most effective change you can make. Shoes track in:
- Mud and soil.
- Oil and grease from asphalt.
- Bacteria and allergens.
By leaving shoes at the door, you eliminate the greasy residue that makes rugs sticky and prone to rapid re-soiling.
Proper Vacuuming Techniques
Vacuuming is not just about picking up visible crumbs; it is about removing dust deep in the pile.
- Frequency: Vacuum high-traffic areas twice a week and other areas once a week.
- The Beater Bar: For synthetic cut-pile rugs, use the rotating brush (beater bar) to agitate the dust. For loop-pile rugs (like Berber) or delicate wool, turn the brush off and use suction only. The brush can fuzz up the loops.
- Direction: Vacuum in multiple directions (North-South, then East-West) to lift the pile and get dirt from all angles.
- Don’t Forget the Back: Once a year, flip the rug over and vacuum the back. The vibrations will knock deep dust out of the pile onto the floor. Sweep the floor, then flip the rug back.
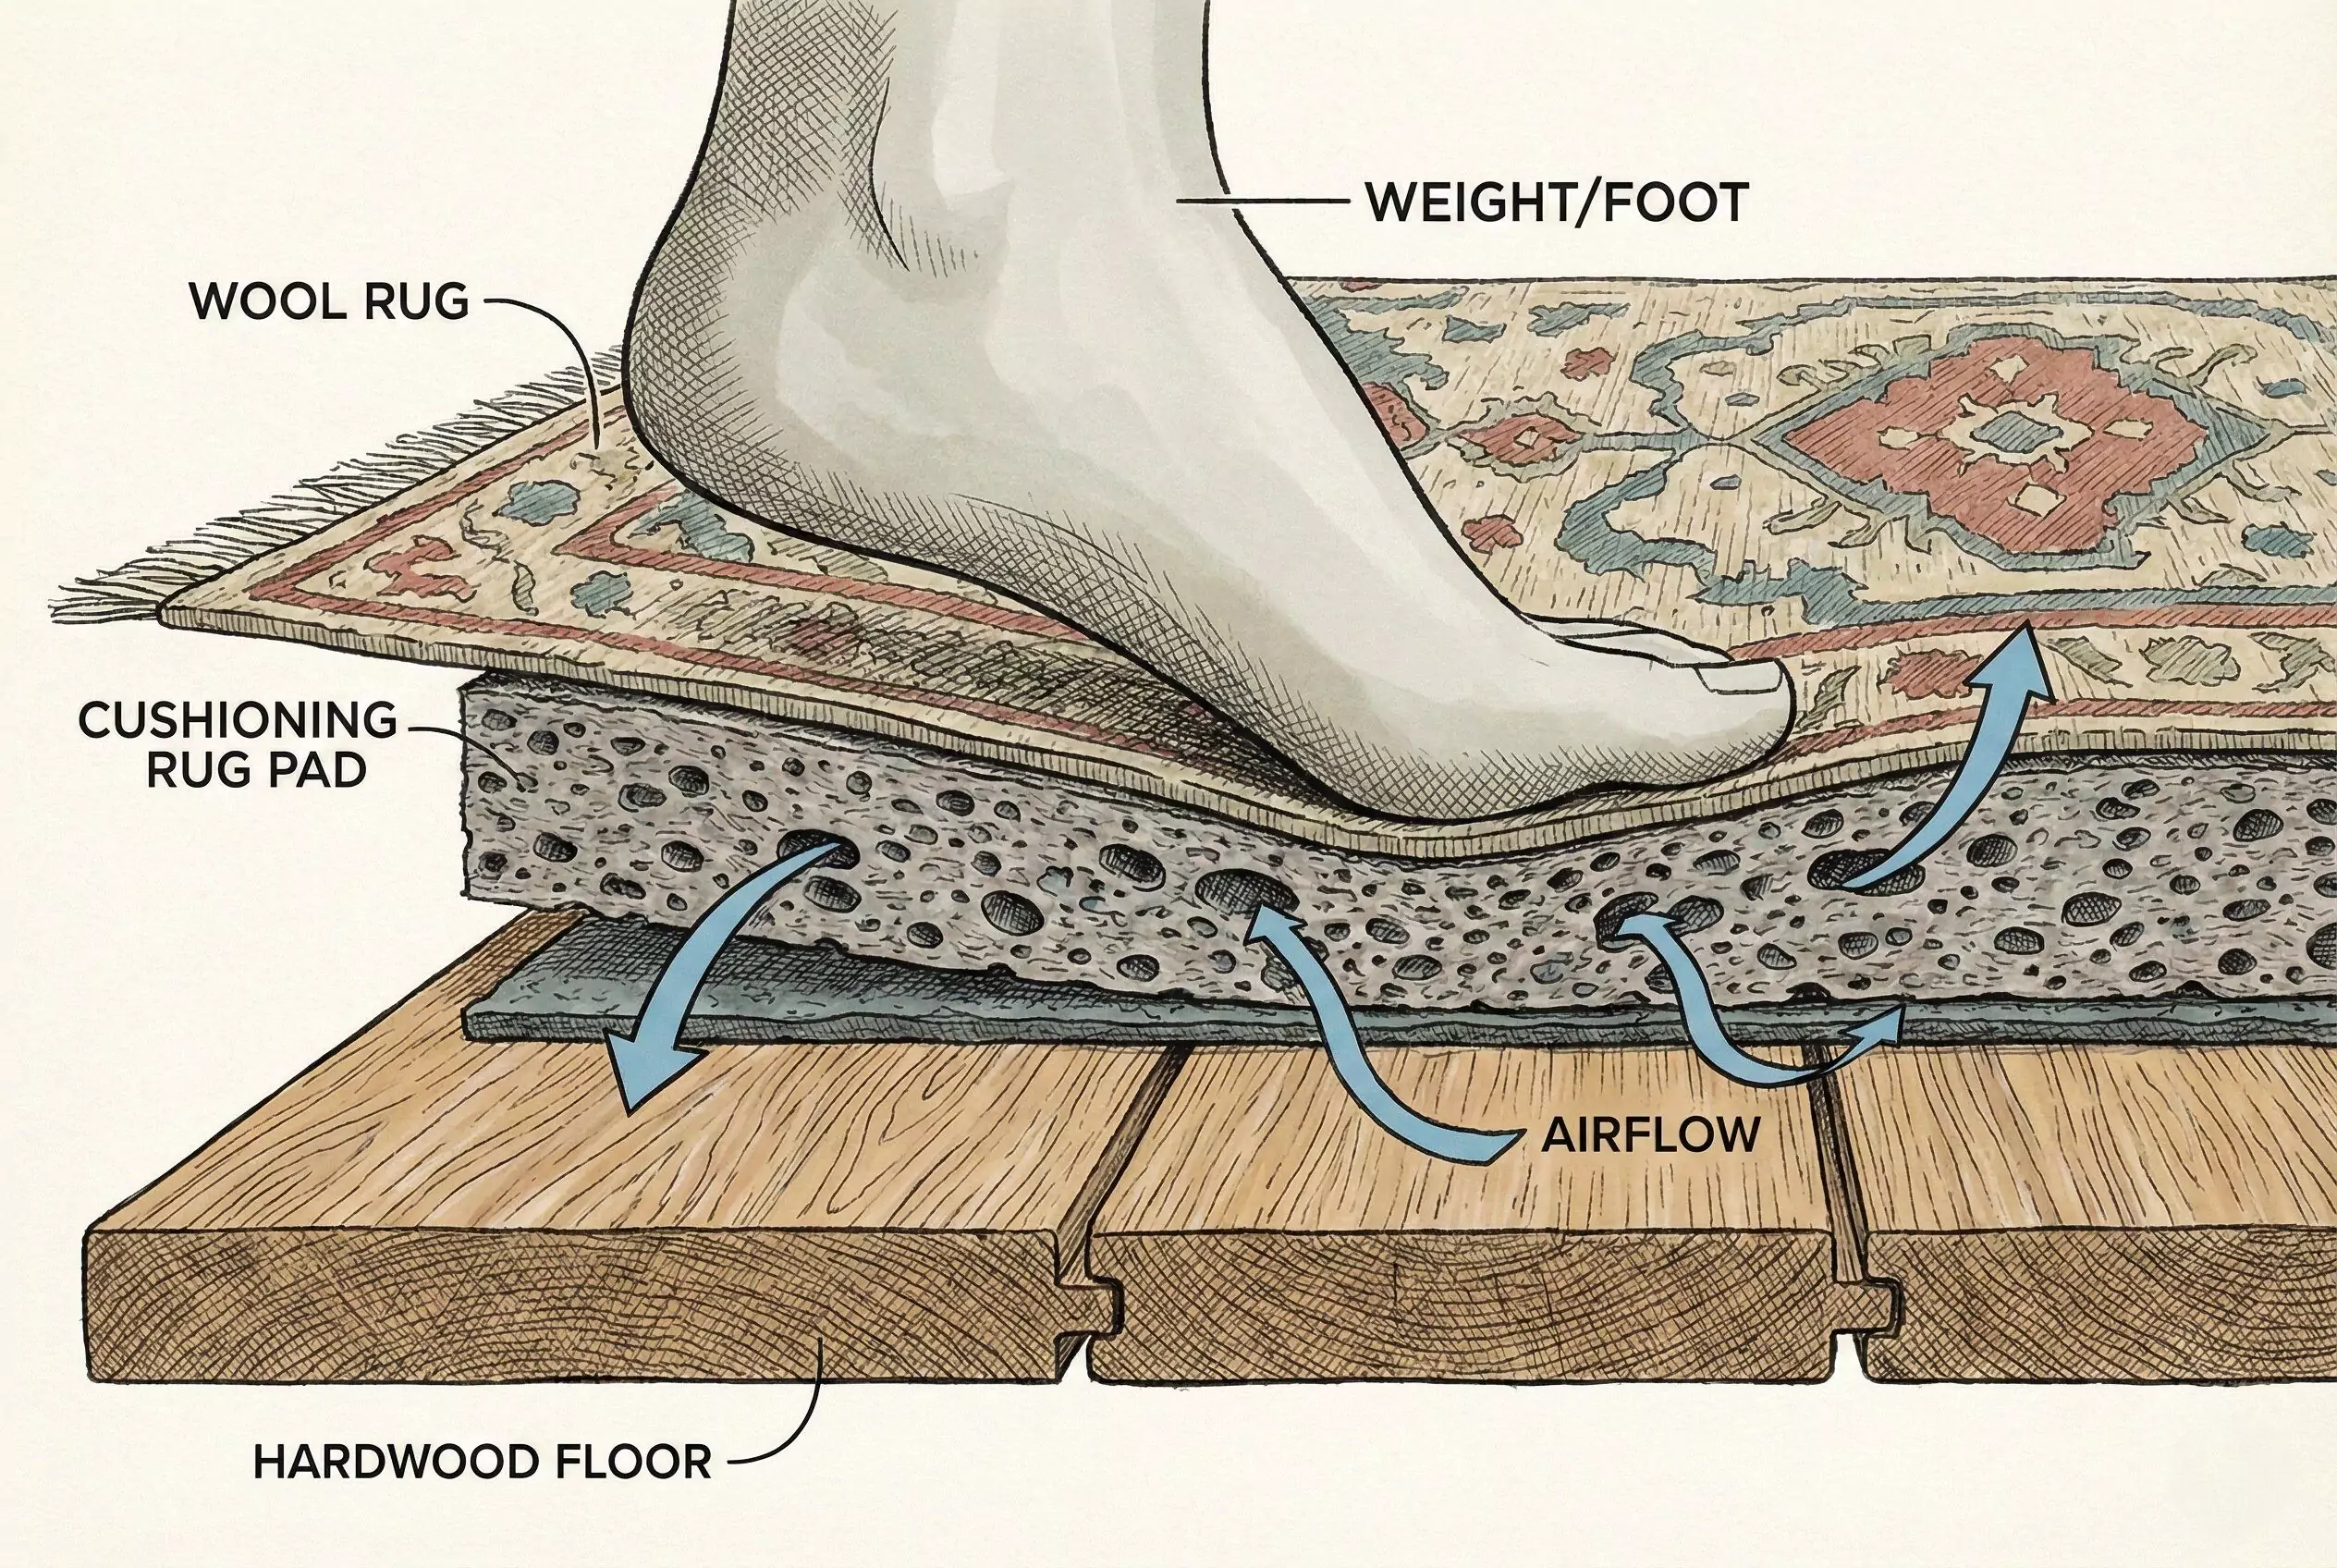
Using Rug Pads
A rug pad is a layer of material placed between the rug and the floor. It prevents the rug from sliding, but it also protects against stains.
- Airflow: A good pad allows air to circulate under the rug. This helps moisture evaporate if a spill occurs, preventing mould and rot in the backing.
- Impact Absorption: It cushions the impact of footsteps, reducing the crushing of fibres. Crushed fibres look dull and dirty even when they are clean.
Phase 4: The Golden Rules of Stain Removal
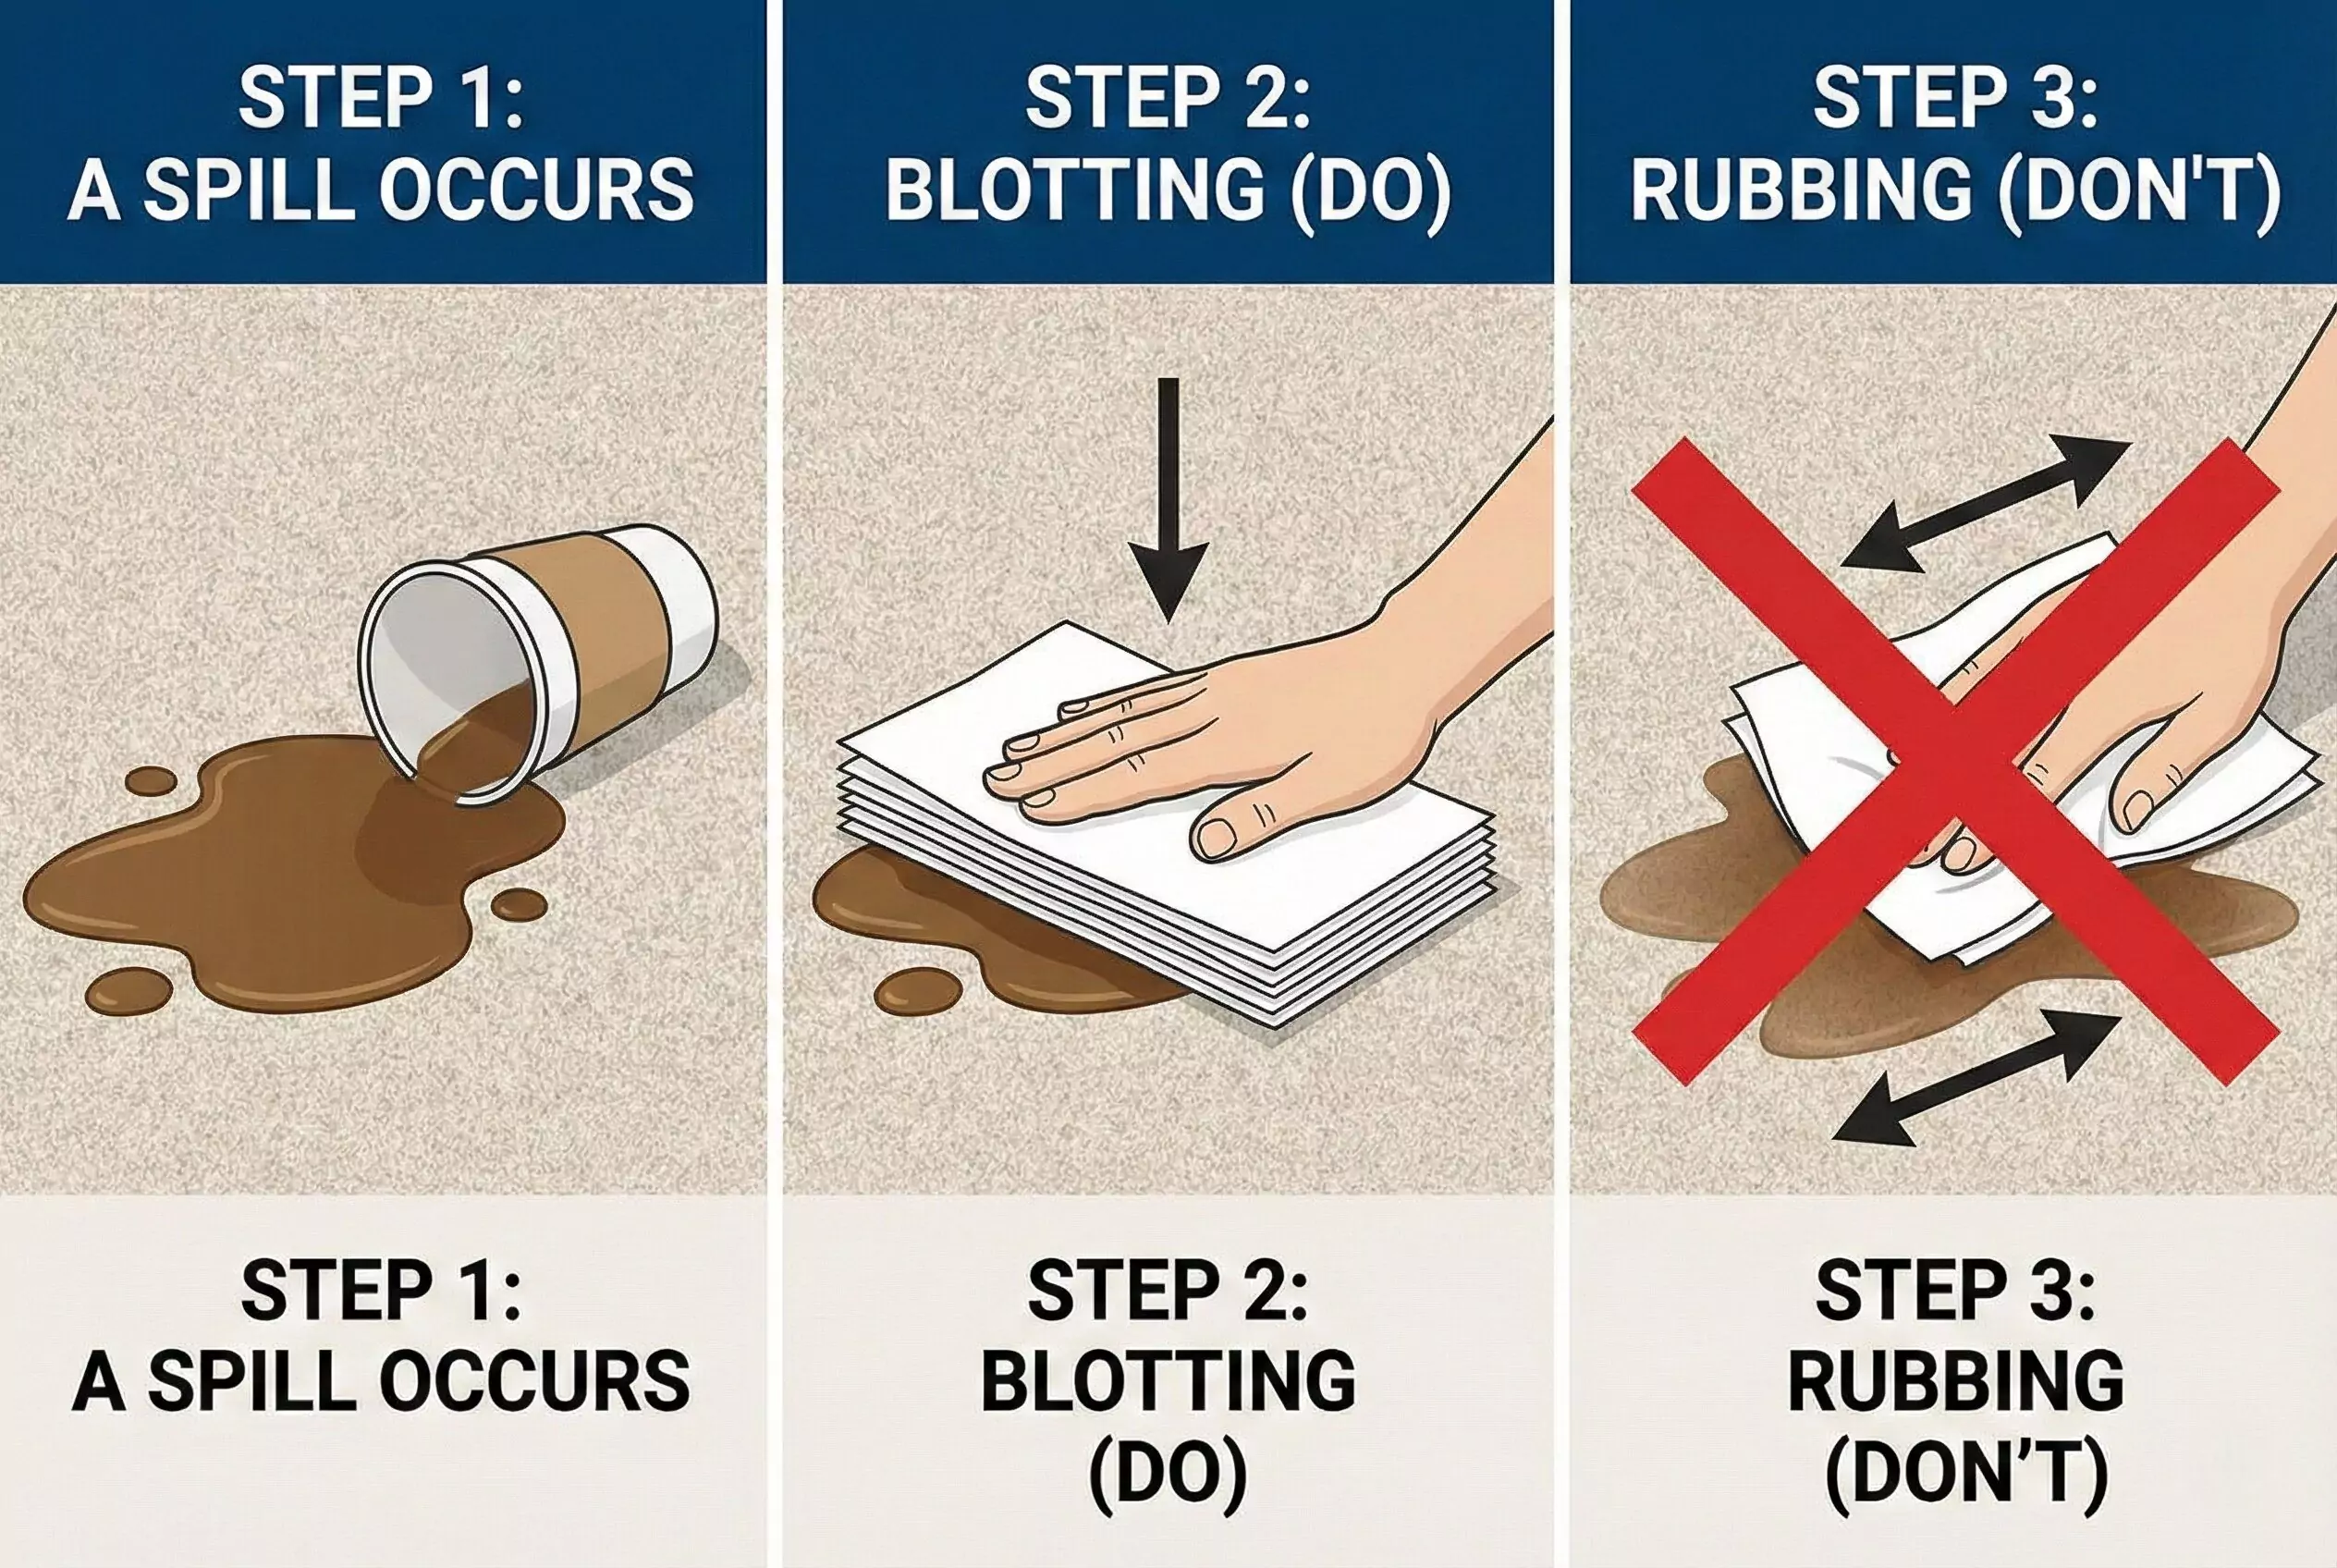
Despite your best efforts, spills happen. How you react in the first 60 seconds determines if it becomes a permanent stain or a distant memory.
Rule 1: Speed is Key
The longer a liquid sits, the deeper it penetrates. It can soak into the backing, where it is almost impossible to remove. Blot immediately.
Rule 2: Blot, Don’t Rub
This is the most common mistake.
- Rubbing: Spreads the stain outwards, making it larger. It also pushes the liquid deeper into the pile and distorts the fibres, causing a fuzzy texture.
- Blotting: Press down gently with a clean, white cloth or paper towel to absorb the liquid. Lift and repeat with a dry section of the cloth.
Rule 3: Work from the Outside In
If you are cleaning a spot, start at the outer edge of the spill and move towards the centre. This prevents the stain from spreading into clean areas of the rug.
Rule 4: Use White Cloths Only
Never use a coloured towel or napkin to clean a rug. The dye from the towel can transfer onto the rug, creating a new problem. Always use white paper towels or a white cotton cloth.
Phase 5: Building Your Emergency Cleaning Kit
You should not be searching for ingredients when a glass of wine falls. Keep a dedicated rug cleaning kit ready.
Essential Tools
- White Paper Towels: Highly absorbent and disposable.
- White Cotton Cloths: For gentle scrubbing if needed.
- Spray Bottle: For mixing DIY solutions.
- Soft Bristle Brush: An old toothbrush or a specific upholstery brush.
- Wet/Dry Vacuum: If you have one, this is the best tool for sucking up liquids.
DIY Cleaning Solutions

You can make effective cleaners with simple household items.
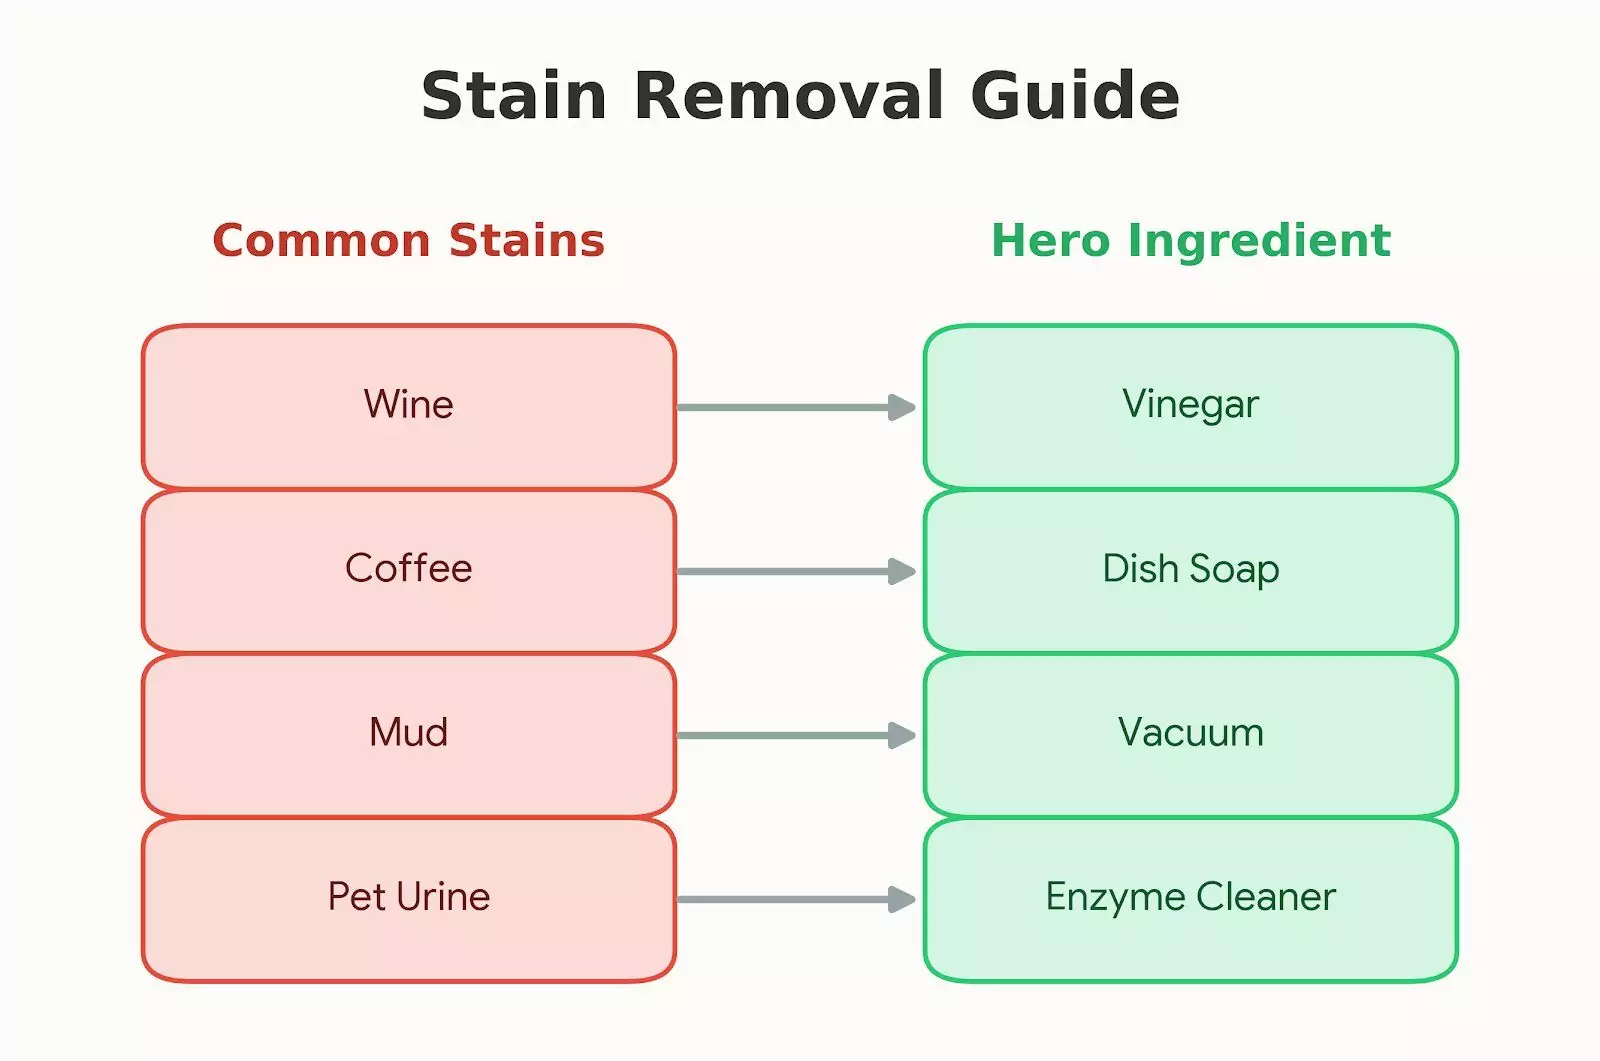
1. The General Cleaner (For dirt and mud)
- 1 teaspoon of clear dishwashing liquid (no bleach, no moisturiser).
- 1 cup of lukewarm water.
- Why it works: The soap breaks down surface tension and lifts dirt without harsh chemicals.
2. The Acid Fighter (For alkaline stains like urine)
- 1 part white vinegar.
- 1 part water.
- Why it works: Vinegar neutralises alkaline stains and helps prevent colours from running. It is also a mild deodoriser.
3. The Grease Cutter (For oil and makeup)
- Baking soda (sprinkled dry).
- Why it works: Baking soda absorbs oils. Let it sit for 15 minutes and vacuum it up.
Phase 6: Treating Specific Stains
Different stains require different chemical approaches. Here is how to handle the most common rug disasters.
Red Wine and Juice
These are tannin stains.
- Blot: Absorb as much as possible immediately.
- Dilute: Dab with a damp sponge (cold water) to dilute the remaining wine.
- Treat: Apply the vinegar/water solution or a commercial tannin remover.
- Absorb: Place a thick stack of paper towels over the wet spot and place a heavy book on top. Leave it overnight to wick up the moisture.
Pet Urine
This is a complex stain because it starts as an acid and turns into an alkaline salt crystal that smells.
- Blot: Soak up the urine.
- Enzymatic Cleaner: You must use a bio-enzymatic cleaner (available at pet shops). These cleaners contain bacteria that eat the uric acid crystals.
- Saturate: Follow the instructions on the bottle. Usually, you need to soak the spot and let it air dry so the enzymes can work.
- Do not use steam: Heat sets the odour of urine permanently.
Coffee and Tea
- Acidify: These are tannins. Use the vinegar and water solution immediately.
- Rinse: Dab with clear water.
- Dry: Blot dry. If a yellow mark remains, a mild peroxide solution (test first!) might be needed, but be very careful with wool.
Mud
- Wait: Do not touch wet mud. You will just smear it. Let it dry completely.
- Vacuum: Once dry, the mud will turn to dust. Vacuum it up slowly.
- Wash: If a stain remains, use the dish soap and water solution.
Oil and Grease (Butter, Salad Dressing)
- Absorb: Sprinkle baking soda or cornstarch generously over the spot.
- Wait: Let it sit for 15-30 minutes to absorb the oil.
- Vacuum: Vacuum up the powder.
- Solvent: If the stain persists, dab with a dry-cleaning solvent (rubbing alcohol can work on some synthetics, but test first).
Phase 7: Professional Cleaning
Even with perfect maintenance, rugs need a professional reset.
When to Call a Professional
You should schedule a professional cleaning every 12 to 18 months. However, call them immediately if:
- You have a large spill on a silk or antique rug.
- You cannot remove a stain after one or two attempts.
- There is water damage (flooding).
- There is a persistent odour.
Methods of Professional Cleaning

- Hot Water Extraction (Steam Cleaning): The most common method for synthetic rugs. Hot water and detergent are injected into the rug and immediately sucked out. This provides a deep clean.
- Immersion Cleaning (Rug Bath): The gold standard for wool and Oriental rugs. The rug is taken off-site, dusted, and fully submerged in a cleaning pit. It is gently scrubbed and then rinsed until the water runs clear. This removes 100% of the soil, including what is trapped in the backing.
- Dry Cleaning: Uses chemical solvents and very little water. Good for delicate fibres like rayon or silk that might shrink or bleed with water.
Phase 8: Long-Term Storage
Sometimes you need to store a rug. Doing this incorrectly can ruin it.
- Clean it first: Never store a dirty rug. Moths are attracted to the proteins in food spills and skin cells.
- Roll, don’t fold: Folding creates creases that can crack the backing. Roll the rug around a cardboard tube if possible.
- Wrap in fabric, not plastic: Plastic traps moisture and causes mildew. Wrap the rug in a cotton sheet or Tyvek paper.
- Elevate: Keep the rug off the concrete floor to prevent moisture absorption.
Summary Checklist for Rug Owners
To maintain a spotless rug, keep this checklist in mind:
- Upon Purchase: Apply a fibre protectant spray.
- Daily: Enforce a no-shoes policy.
- Weekly: Vacuum (suction only for wool/loops).
- Monthly: Check for spots you might have missed.
- Annually: Rotate the rug 180 degrees.
- Every 18 Months: Professional deep clean and re-apply protectant.
By following these simple steps, you can ensure your rugs remain vibrant, fresh, and comfortable for years to come. A little prevention is worth a lot of scrubbing.
